Monday, June 3, 2013

Final Blog Post


final art reflection
  1. Which project do you consider your most successful? How did you develop your craft with this assignment? What tools, methods and materials were essential to your success with this project? What ideas, feelings or meanings did you want your piece to express? How did you go about expressing it? 
  2. Which project was the most challenging? Look at your brainstorming for this project. How does the final work(s) resemble your preliminary sketches? What changed? Why did you make the changes that you did? What problems emerged in the creation of this project? How did you solve the problems? 
  3. Please discuss three new strengths you've discovered or deepened this year. One formal strength (your ability to work with things like composition, balance, rhythm et cetera), one technical or media-specific strength (working in a specific medium or honing a specific skill) and one conceptual strength (you idea development in the specific project). 
1.  The project I consider most successful is my black and white photography project.  I developed my craft by taking a lot of time deciding when and where I would take my photos, how I would place the rings (my objects in the photo).  This helped interpret when the light would be perfect on the shiny metal, reflecting beautiful light into the image.  I placed the rings over and over in different positions and at different times so it would be just the right time.  It was difficult though, because I would place the objects in a good spot one day, but then a block period would be at a different time of day the next day, so the lighting and the placement would be different.  I used my metal rings, some with jewels to reflect more light, and trees and benches to make this possible.  The idea behind my images were to express the different emotions with the black and white images.  Mine was supposed to evoke a happy kind of simple feeling.  It was very placed out, in one of my images each of the three rings was placed one in the center and two on the edges.  It made a very geometrical, simple but shaped and crafted image.  
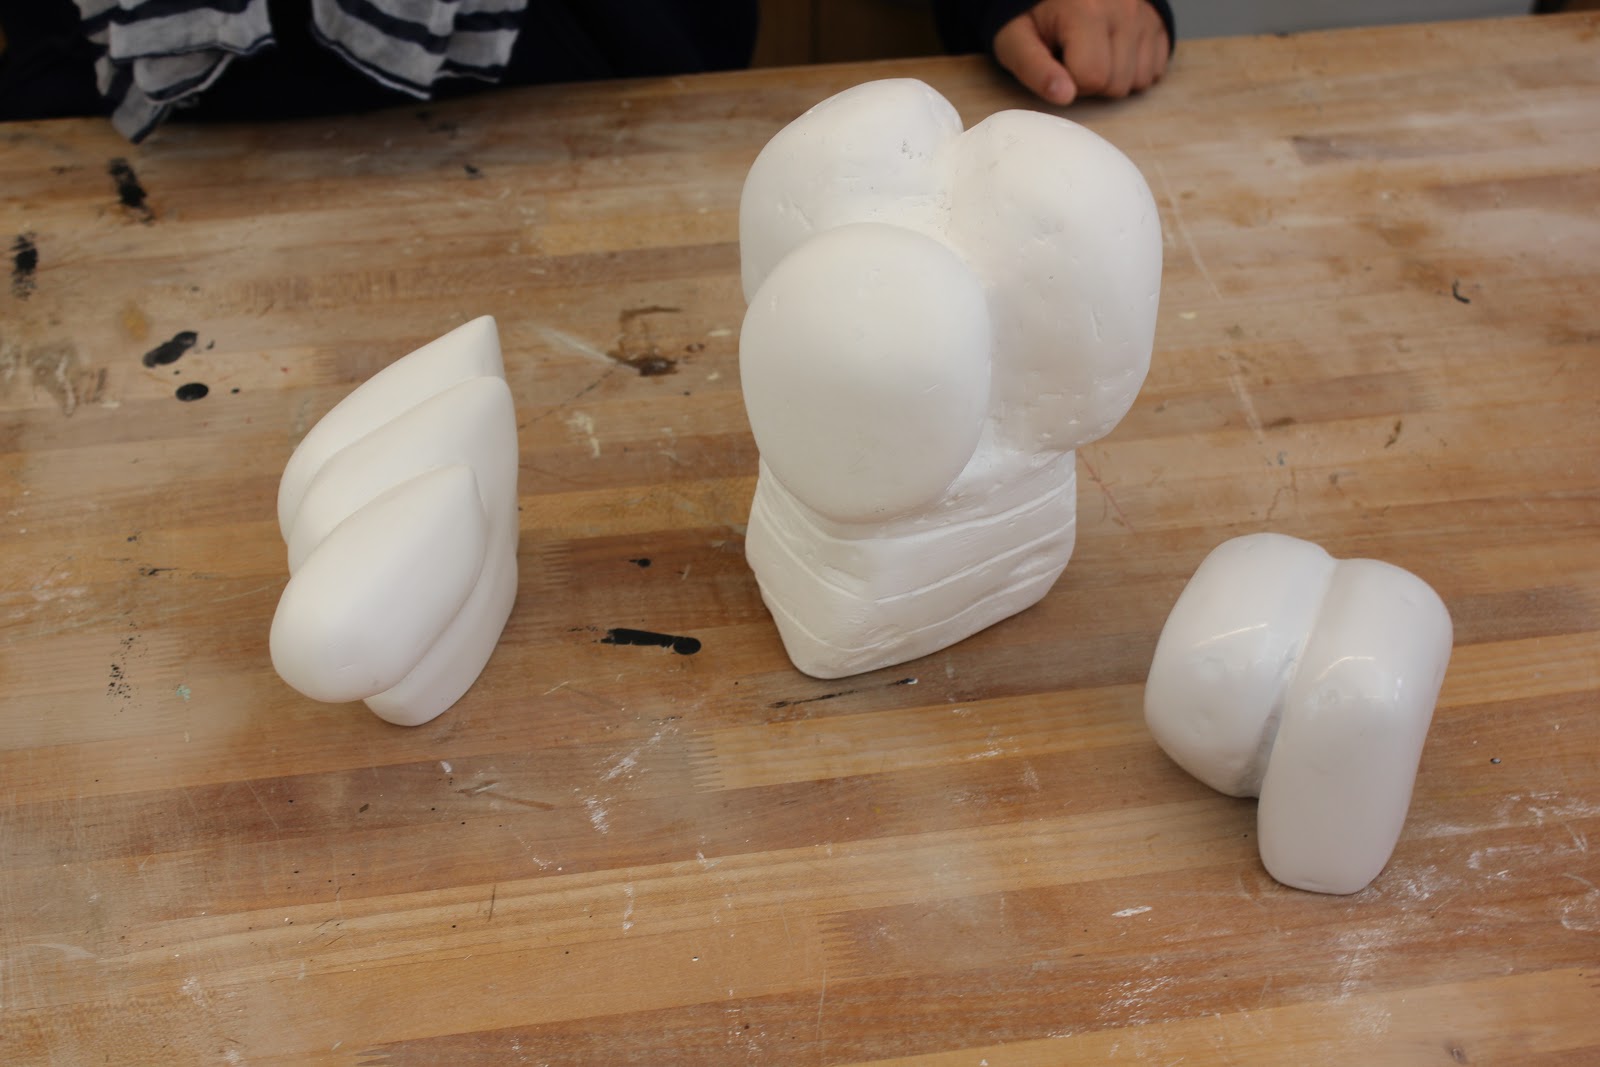
2.  The most challenging project this year was the ending sculpture project.  Although it was fun, it was very difficult to make details with the tools we were using.  My preliminary sketches in the beginning were quite different from the outcome. It had been a hand holding the heads of balloons.  But in the end it had changed, because of the time we had and the detail I could accomplish.  In the end it is a squarish looking block with lines (like the dents in a hand for fingers), more abstractly than a hand, and round block-like smooth, round balls that look like they are jutting out of a rock-like formation.  It was hard to accomplish what I wanted because I couldn't do much detail in the time I was given.  It was hard to take the shapes out of the plaster block I had started with.  Not many problems occurred during the process of this sculpture.
3.  My ability to work with textures strengthened over the year.  I started off with the 'rubbings' and I would go around trying to find cool shapes, not necessarily objects. I went to the sun dial and got a 5 and the restroom and got a shape of a girl.  I soon realized those weren't textures and I explored more in that, helping me with my textural projects soon after.  Also, I strengthened with my drawings, in the beginning the line drawings weren't too impressive and as the course of the year went on, I added in textures and thicknesses and different colors, making my drawings and paintings more vivid and lifelike.  Also, I could enjoy the process of art. At first I was more impatient, but soon realized things take time, a piece of art won't just show up overnight, it takes practice and practice to get what you want and time to create it.  It took drafts and different drawings to figure out my final projects but I got there, happily 


Thursday, May 30, 2013

Form


Self-Reflection Questions: 
Envision | Express
 Restate your intentions for this project--how did you combine abstracting the figure with an outside influence?  
Develop Craft |Engage and Persist
How did you push yourself to gain a better understanding of the physical properties of the plaster?  In what ways did you come to better control the various tools you employed?
Stretch and Explore
In what ways did your intentions change over the course of your project?  What opportunities or occurrences led to these changes?
What were some of the specific formal areas you focused on to realize your piece? how did you employ form, gesture, texture to reinforce your intentions?

photographs for this blog post-- 
1. documentation of sculpture
2. documentation of the group process response from the critique
3. document of final sculptural grouping 

My figure was intended to be a hand holding balloon like figures.  It was supposed to reflect the motion of being held down, but has the possibility to go anywhere.  Just like if you let a balloon go, it will fly away, and it has the capability of traveling everywhere.  My object ended up being a rock like bottom with lines for an abstract finger look with round 'balloon' looking things attached to the top, but being held down.
In the beginning I had just been 'stabbing' at my plaster block, assuming that it would just take form on its own.  But soon realizing that my method was not working out as I had planned.  I took more careful into rounding more with the 'cheese grater' and my objects too shape.  After I stabbed myself in the finger, it added more motivation to my work and more care.  I would try harder, a: to not hurt myself again, and b: to put more effort into my work.  I had a hard time understanding some of the tools in the beginning, but soon got more comfortable with them and my work and became a better artist. 
I employed a very smooth balloon figure on the top because I really wanted to emphasize the freedom and smoothness that balloons have the capability to be.  I did this by shaving away the rougher parts with a rounding method with the cheese grater.  It worked better then I had thought, so I stuck with it.  The bottom has  a rougher texture, implying the ground is rough but one can fly away (like the balloons) that I had abstractly sculpted.

Tuesday, April 23, 2013

Value Project: Final Review


My engagement in this project with these new materials such as chalk and photo developing, helped me push myself further to resolve these tools and methods.  In the beginning of this project, I was kind of wary about erasing or darkening the chalk.  By the end, after weeks of this project, I was able to feel comfortable using these objects and ended up making myself a better artist, because I realized that the more I used these tools, the better I could contribute to my work.  By feeling more comfortable with the eraser, I could really show the different contrasts with the shadows and the light to represent the 3-D form.  
Although I had a great time with the eraser and the chalk, I did find the dark room more fun and mysterious as an environment to work in.  While on the charcoal drawings, you could make a mistake and mess up your entire project, but in the darkroom one had time to explore their photographs by making un-final prints, and as many as you liked.  You could make multiple different practice shots, and then do one final one.  The product of all the photos made me feel proud when I walked out of the dark room, seeing the black and white photo go from the tiny film strips to a shiny black and white print.  I think the charcoal drawing was more open to ones expression though, because in the film room, you couldnt really change what you had done.  It wasnt as flexible for the freedom of ones expression.  While doing charcoal drawings, one could erase and one could add onto what they had to make it more of 'their own work.'
I could definitly improve myself in both mediums if I had a chance to redo the project over.  I could take more time in the beginning with the photographs, and make different compositions of my own that were more interesting to look at.  I could spend more time looking for good light and dark sources to make my photograph more vibrant.  Also, for the charcoal drawing, I could focus more on the texture than anything.  

Monday, April 22, 2013


Interim Blog Post?

    • What specific techniques and habits do you need to focus on after break to fully merge your intentions with your final works?

I am trying to evoke the light sources so thta different parts of the objects receive different amounts of the value scale.  For example, on my metal ring, it is shiny, so it reflects light easier than a matt object.  I am currently using value to influence my viewwer's experience of the drawing and photographs by taking different aperatures and light sources on my different objects.  

Abstract Relief Sculpture

           My collection of textures is quite varied.  I used some geometric wire, with some crumpled paper, a little bit of burlap and a metal plate, accompanied by a variety of nails.  The juxtaposition of my materials worked quite well, some stood out more than others, but it was the purpose.  It didn't end up too differently than the 2D image I had created before.    I had many different ideas in the beginning, but I ended up choosing the more geometric and mirrored image that I created.
            The degree that I pushed myself to rework and refine my work was average.  I took a few classes in the beginning to figure out just the materials I would be using.  In the end I had made more of it 3D than I had intended in the beginning, but it really added to the final product.  The compositions of my final prints and relief sculpture are pretty well unified, as they are similar yet different.  They are completely different materials that I used, but together they looked like one, pretty similar textures/ materials.  
                 During reflective or evaluative discussions and writings I was pretty thoroughly involved.  I used the time to gather information and reflections from my other peers and classmates, but I also contributed to it plenty myself.  I was able to communicate my aesthetic insights and concepts pretty intellectually.

Monday, March 11, 2013

The Art of Value


Value is the scale from dark to light, and how one goes about using it, with textures and patterns etc.  We are going to, and have used this by taking a still life image and drawing it using chalk and pencils with different scales of color and different textured prints.  For example, with the pencil we did some cross-hatched or striped textures and with the chalk we did a more smooth, lesser texture.  We are just trying to receive the full value of the image we are looking at, with the different views of light, natural and industrial.  This is less of a lines project, and more of a texture vs shading project.  Because the lines cant define the different light source given to your object, it just defines the outline.

In my four different photos, presented above, the one which is most evocative is the top one, where my four rings are equally presented in a row.  This is evocative because the contrast of black on the bottom and white on the top draws your eye to all the different places in the photo.  Also, lining up the rings equally spread out makes your eye not go crazy because it evens out your view.

The picture with the most value on my object of the rings, is the bottom one.  This is because the shadow on the top left, and the sun coming in from the right makes the value scale a lot longer.  Although, the rings do not stand out too much because of the pattern on it, verse the background of the wood behind it.  But the light coming onto the object makes the object a range of scale.

In the future, I will do a few things differently.  I will start by going to take pictures during a certain time of day.  This will help create  a larger range of value on my final product.  If I go take pictures in the morning, this will reduce my value scale, and make things more dark.  This is because the sun won't be out yet fully, so the rays of light won't be hitting my object in the correct area.  Also, I will take more time to focus on different areas.  I will stay in one spot and try to capture the image in different ways.  By moving the camera up a little to the left, or down and sideways, just trying to capture the same image in a different way.

Tuesday, February 5, 2013

Degree of Exploration (Stretch and Explore)


In my collection of textures, there are quite a few different pictures and drawings that I used.  Although,  some of them do repeat around the composition.  For example, in this one, I started off with a picture of a lady on a bathroom sign.  You can't really see the texture, but as I mixed it up and used different textures to cover different areas, repeating in some places to make it 'even,' it doesn't end up looking like a flat surface, like it did in the beginning.  Also, I wish I had focused on more of an organic type of composition, instead of industrial, more distinct shapes.
The colors for this one, were varied.  Instead of doing all black and white, or all sepia, it is slightly a mix of both.  I started off with the black and white background, but added some different textures, of the sepia range, on top for effect.

The different textures fit together pretty well. I think if I had more time, then I would have been able to unify the textures more, or make them fit together easier.  It's not like they don't fit together, it's just that they could be more organized, even by the display of the colors.